New Take on The Family Canvas Challenge

*I wrote this post 3 months ago and am just now getting it up. My resurgence of creative energy at that time was short-lived, but I’ve been getting stronger and it’s coming back more and more*


June 24th 2019: After 6 months of illness and recovery, I’m finally having a resurgence of creative energy! I still don’t have a ton of physical energy, but I wanted to get back in the studio with my girls and try to finish our canvases we started in November.

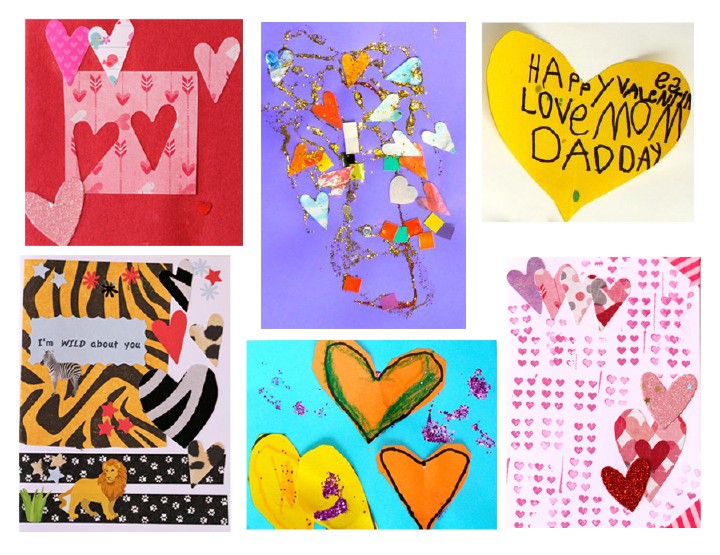
Whenever I run the Family Canvas Challenge, I encourage families to collaborate on a shared canvas, but working individually can be just as great. Because we’ve made 3 family canvases together, we often try something new each time to keep it interesting.

Read More

Invitations To Create: New Videos & Prompts!

Are you familiar with Invitations To Create?

Invitations To Create are open-ended art prompts set up for kids to encourage creative exploration of materials. I first learned about these types of art prompts when I was a Reggio-Inspired preschool teacher and have since used them with my own kids for the past 9 years.

Invitations To Create have been the one tool I go back to again and again to keep my kids engaged with their art supplies and to learn new skills.

I’ve been working on a few new projects that involve Invitations To Create and I’m so excited to share them with you today!

Read More

Easy, Artsy, Ornaments & The Coolest Kid-Made Wrapping Paper

Every holiday season, our family loves to spend time together making playful decorations and gifts for loved ones. With young kids, I always try to make these crafting activities fun, simple, and process-based, so kids can truly enjoy the experience.

(This post is sponsored by Walmart (thank you Walmart!), all opinions expressed are my own)

5 Artful & Kid-Friendly Holiday Projects

This year, I am so excited to partner with Walmart.com to share 5 of our favorite artful and kid-friendly projects for the holiday season. We had a blast making these colorful tree ornaments and the coolest kid-made wrapping paper you’ll ever see!

I love these projects not only because they are super budget-friendly, but even more so because they bring us together as a family to have fun, get crafty, and make gifts for others. Isn’t this what the holidays are all about?

Here’s a peek at my new favorite printing technique for kids- It’s easier than you think!

How To Make Your Own

In addition to the mini canvas ornaments and the wrapping paper, I’m sharing 5 super fun and easy holiday projects that the whole family will love over on Walmart.com.

Click here to head over to Walmart’s blog and see all of the steps and supplies for each project.

What’s your favorite kid-friendly, Holiday project? I’d love to hear about it in the comments below.

DIY Valentines from the Heart

DIY Valentines from the Heart- The Art Pantry

Encourage kids to express authentic gratitude and love this Valentines Day, by making something from the heart. Handmade Valentines are easier than you think! Just set up a Valentine crafting station with some fun supplies like blank cards, patterned paper, fancy scissors, glitter glue, markers, washi tape, stamps ,stickers, or whatever else you have around. Invite your children to make their own Valentine cards for friends and family. If they need a little inspiration, you can create a few samples ahead of time, or sit down and work along side them!


Handmade cards are filled with so much love and joy. I’ll take that over candy any day!


Secret Message Valentine Gift Experiment

Karuna recently discovered these cute mini paint sets in the toy store. I didn’t know if they would paint very well, but I thought they were the perfect size to give as gifts with a secret message Valentine (one of my many “Pinspirations“). We first cut out a heart from watercolor paper, then used a white crayon to draw a hidden Valentine message. The white crayon on white paper keeps it invisible until you paint over it with watercolor. The crayon will then resist the watercolor and you will see your message!

Karuna was so excited to find out what her secret message was, but sadly this little paint set was not up for the challenge. The small brush created scratches in the paper and the paint trays couldn’t hold enough water to lose their opacity.

So we started over and tried a real watercolor brush and some better quality paint and… voila! The secret message was revealed!

With the success of our new paints, Karuna couldn’t be stopped. If I hadn’t convinced her to take a lunch break, I think she could have gone all day making secret Valentines. I’ll remember this next time I need to do some work around the house :)
I’m still intrigued by the idea of giving a secret card with an attached watercolor set.  With a nice set, this little baggy would be an awesome goody bag, thank you card, or birthday present. Just write an invisible note and gift away!
 

Papermaking

Last week’s art class was all about paper. We played with paper, ripped paper, glued paper collages, and even experimented with making paper! The teachers prepared the paper pulp, by blending up white newsprint with water. When the children arrived they were offered a mixing bowl, spoon, white pulp, liquid watercolors and glitter to create their own unique paper pulp.

At first we tried spreading out the pulp onto a screen with cheesecloth to drain the liquid, but that didn’t seem to work well (and didn’t capture the children’s attention like we thought it might).
So the teachers adjusted their process and offered each child a tray with a towel and a piece of fabric to soak up the pulp juice. Being able to work individually at their seats helped get the kids excited about the pulp.  They used all kinds of tools to squish it, pound it, roll it and color it!

To really flatten the pulp and get the excess water out, the kids placed a piece of fabric over their pulp to continue the pressing and rolling process.

For the final step, children could shape and decorate their paper with flower petals and sequins- check out this paper pulp man!

 After drying for a few days, the papers were firm and ready to take home. They looked awesome!