Organizing the Studio

Before each session, I try to bring new life into the studio. I do a major clean-up, add new materials, and re-organize. It’s important for me to reflect on how the children have been using the studio and re-work the environment to fit their movement and curiosities. As they say in the preschools of Reggio Emila, the environment is also a teacher. So it’s always a work in progress!
Organizing the collage materials into glass jars and displaying them together on the top shelf adds an element of sparkle and intrigue. Because of the glass factor and organization, they are just out of reach, but always available if anyone asks for them. I also acquired some new buckets to organize the brushes and tools. I’m curious to see if the kids will carry these around the studio because of the handles!


Let the fall session begin!

Naomi’s Bedroom Makeover

My niece, Naomi, recently turned 8 years old. One of her birthday wishes was to make some changes to her room. As you can see from the before photos, there was little about her room that said “8-year-old girl.” Her room housed a rarely used family computer, a toddler table set, Hello Kitty bedding from years ago, and an outdoor mat.

Naomi’s Nana offered to sponsor a makeover (within a budget of course!) so I set out help make this birthday wish come true. These are the photos I took of her room as we discussed what type of design she hoped for.


Naomi chose the bedding on the Pottery Barn teen website which gave me a jumping off point for the colors and feel of the room. She was drawn to the oranges, blues, and yellows of the bedding and her main request was a bed canopy. She also asked for some paint on the walls (including chalkboard paint), but they are in the process of putting their house on the market so we decided to only change what can easily be moved to a new house. This also meant that I had to somewhat design the room to stage the house… so less is more! My goal was to turn the room into a cozy, bright, girly (but not too girly), functional room that Naomi would want to spend time in.

Naomi’s artwork hangs in the bedroom entrance, brightening up the corner, and setting the tone for the colors of the room.

To stay within the budget, I purchased a worn used desk, repainted it, and added new knobs that Naomi picked out from Anthropologie. The bottom of the desk pulls out for extra surface space.

I made this bulletin board by upholstering a plain cork board with fun, Amy Butler fabric.


I added the shag rug and low chair so that Naomi would have an inviting space to hang out with family and friends on the floor. The soft blue blanket (another request from Naomi) adds a final cozy and luxurious touch to this tween room.


Chalkboards

I’m a huge chalkboard fan. Having a chalkboard in your home is a fun way to bring artistic creativity into your child’s life (and when there are accidents, chalk is easier to clean off furniture and walls than markers or crayons!)
Below is a picture of a chalkboard wall in Karuna’s bedroom. I hung a bucket of chalk at her height for spontaneous artwork (or in this case, for our adult friends to have a little fun- thanks, Tom, for the huge portrait of Karuna!). I was initially worried about the dust, but as long as I use a wet rag to clean the floor and wall every once in a while, it hasn’t been a problem.
I covered The entire wall with Benjamin Moore chalkboard paint, but there are also less dramatic ways to introduce chalk drawing into your home. If you’d like to paint a chalkboard surface directly onto your wall, but want something a little smaller, you can always cover only part of the wall with chalkboard paint. The chalkboard in this photo is painted below the wainscoting- for toddler’s only!Another option for creating a chalkboard surface is to paint a framed board with chalkboard paint. This photo from the Hudson paint company shows one of their beautiful color options- an alternative to the basic black or green found at most paint stores. If you’re in the neighborhood (Mill Valley) there’s a new craft store on Miller ave. Called “Once Around” that carries a colorful variety of Hudson chalkboard paint.
If you can’t paint your wall and don’t want to bother making a framed chalkboard, you can buy a chalkboard decal that you stick to your wall and peel off when you need to move it. They come in fun shapes, like this gorilla- which I found at Modern Nursery.
For table-top chalkboards, you can get something like this from Offi, or you can just paint your own table-top with chalkboard paint!
So many fun ideas!

Displaying Children’s Artwork

Many parents have asked me about interesting ways to display children’s artwork. Displaying children’s art shows them that we value their work. Children feel proud of their creations when they see them prominently displayed around their home.
I like to take two different approaches to children’s art display. First I choose a piece of work that I want to have up as permanent art (I chose Karuna’s first painting for sentimental reasons as well as for the colors and design). Canvas paintings are great because they look good unframed. Otherwise, I buy a nice frame that will go with my home decor (or a very simple frame to showcase the art) and hang it up with the other art around my house.
Karuna’s first painting is displayed in a glass clip frame, which was under $15 at a framing store. It hangs alongside two Scott Healy originals (my brother).

The second approach is for rotating art. Children can make numerous amounts of art and it is important to update rotating displays often to encourage new creation. Here are some ideas for displaying rotating art:
Box Frame

This frame may look like a permanent display, but it is actually a box that opens from the bottom and allows you to store up to 50 sheets of paper inside, displaying the one on top. To rotate the art, simply pop in a new painting and give a fresh look to your display! It can be hung on the wall, but I decided to prop it up on a picture ledge for easy access. I purchased this “Kids Keepsake” frame from Aaron Brothers for $45 – a bit pricey, but the storage is great. It also comes in a smaller size and two other colors.
Karuna helped me set it up and place it on the shelf. Then when her dad came home, I asked her “where is your artwork?” and she ran over and proudly pointed up at it.

A cork wall or board is a fun way pin up rotating artwork in a contained area. In this playroom, the family has installed cork into the wainscoting for a more formal look.

A bulletin board such as this one is another example of pinning up children’s artwork in a simple, stylish way. You can make one yourself or find them at places like Pottery Barn or the Container Store.
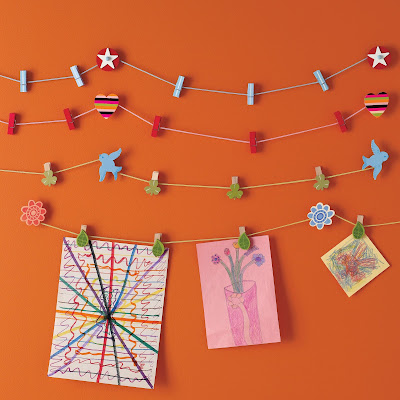
Clothesline
In the studio, I hang artwork up along the wall, fastened to a string with clothespins. I screwed 2 small hooks from the hardware store into the wall and then tied a long piece of twine tightly to each hook. Mostly I use this for drying paintings, but it is also great for displaying art (and it won’t damage the artwork with pinholes).

Or if you’d like to get fancy, you can buy a set with fun clips like this one at The Land of Nod for only $13.

When all else fails, take a Photo.
If your child makes 3-D art that is going to be tossed at some point (or even when they build something out of blocks or toys) you can capture this in a photo and keep it forever!
Image via Cookie

I hope this was helpful!

Studio Transformation

Here is the beginning of the transformation- from a blank canvas to a workshop where imagination and creativity flow.


I’m slowing adding materials to the shelving- and discovering what I can put at toddler-height!


Karuna and Austin painting their first watercolor resists on oil pastel drawings.
Exploring new materials