art supplies for big kids organization containers

Creating a Makerspace: Art Supply Organization for Big Kids

I recently finished a local project for a playroom art area/makerspace for 3 kids ranging in age from 5-10. Before this, they had an art area with toddler-sized furniture and art supplies dumped into drawers and unorganized containers. Their main goal was to update the materials to create an organized and inviting makerspace that will inspire creativity through accessible materials and provocations (or invitations to create). I created a plan for adding new supplies and organization so that the children will know where everything is (and know where to put it away!) and they will be able to easily access these items whenever inspiration strikes.

For older children, a wide variety of materials doesn’t have to be overwhelming (as it might be for younger children) if it is organized well and clearly labeled. The labeling also makes it easy to put things back when finished!

Making Art Prompts Always Accessible

I wanted to create a way to offer an ongoing flow of Invitations to Create. I did this for a past client (10 years ago!) that I shared about on this post here.

So I set up this shelf system (seen in the photos above and below) with trays that can have ready-to-go art prompts. To get my clients started, I set up a simple prompt with blank greeting cards, and various materials to use with the cards (drawing tools, stamps, & stickers). These prompts can be swapped out daily for other prompts or whenever the current ones get used.

(You can find over 55 art prompt ideas in my book The Art Playroom) or you can watch my free video series here.

Art Display

Another tip I want to share with you from this project is about creating an art display board. There are many ways that you can display kid’s art around your home. For this project I wanted to include something that would fit with the home’s modern aesthetic, but still be large and easy for the kids to hang their own artwork. To best fit this need, I ended up making an art display board. I started off with a large framed canvas (roughly 5×3 feet). I then glued cork tiles to the back using heavy duty craft adhesive, and then covered the front of the canvas with fabric (stapling it to the wooden frame in the back). In doing this, I turned a large canvas into a fabric corkboard. To make it easy for kids to display their own art (and to keep the art from having pin holes) I added colorful clothespins that are attached to thumbtacks. They can be moved around the board by sticking the tacks into the cork and when art is ready to be hung, you can just clip it up.

Storage

To add more storage, I swapped out the family’s toddler bookshelf for this large shelving unit (below) with adjustable shelves. This photo is from before I finished adding all of the books and art supplies, but I did leave some shelves empty in the end so the family will have room for new items in the future. The large bins on the bottom hold dress-up clothes and accessories for play.

Work Surface

I also included a new table with benches and chairs so the kids can have a large work surface (previously they were working on the floor). Another detail that I added is a drying rack for art projects (you can see it on the right side of the photo behind the table and next to the built-in shelving).

Overall, the biggest key to creating an art area/makerspace for older kids is organization. I talk more about this in my post about setting up a big kid art space (that shares how I updated our home art space when my kids were 6 and 10 years old). You can read it here.

If you’re ready to update your art space (or set one up for the first time) feel free to reach out with any questions!

Design Camp Before & Afters Part 2: Kids’ Art Space Transformations

Over the past two and a half years I’ve held five sessions of my online course, Art Pantry Design Camp, and have witnessed amazing transformations. Some participants start off with an empty space, but most start with a disheveled area- strewn with toys, loose papers, or mixed up bins of art supplies. Occasionally a participant will have a whole room to work with, but most often these art spaces are tucked into a corner of a living space, office, or playroom. By the time the course is over, each space becomes an organized and inviting creative workshop, perfect for that particular family.

Read More

Toddler Art Space Tips & My Youngest Client Ever

A year and a half ago I was hired by a local mom to set up a toddler art space for her 16-month-old daughter, Sadie. She wanted the art space to be in a small area between their family room and kitchen so that Sadie could have easy, independent access to the supplies. I was so impressed at my client’s willingness to jump right in with such a young child and allow for messy art exploration in the hub of their home.

I have found that when it comes to allowing kids independent access to creative tools and materials… the earlier, the better! Toddlers are naturally curious about their art supplies and they will learn quickly how to use them through guidance and exploration. Through their exploration, they will develop important fine motor skills, creative confidence, and a self-sufficiency that will carry over into other aspects of their lives.

Read More

My Home Tour

It’s been a while since I have shared photos of our entire house. I was recently interviewed by Glitter Guide about our home and how to encourage creativity and playfulness, while still keeping things organized and stylish. The amazing photographer, Vivian Johnson, shot the photos and has beautifully captured the spirit of our home and play. Thanks for taking a peek into our family home. I’d love to hear from you and learn how you bring creativity and playfulness into your home!

Home Tour01

Read More

Big Kid Desk And Art Nook

Do you remember the feeling you had when you finally felt like you were a “big kid”? One thing that always evokes that sense of growing up is having your own work desk. Swapping out an old play table for a big kid desk and some new “grown-up” supplies is a simple way to celebrate a child’s development or a milestone birthday.

I love to help families with this transition, so when a friend hired me to design a big kid work space for her daughter’s 8th birthday, I couldn’t wait to get started. The first time I worked on a big kid makeover project was 6 years ago and it also happened to be for an 8-year-old’s birthday (you can see it here).

Read More

Our Home Art Studio

When the new year came around last month, I felt a strong urge to clear the clutter and re-organize our house. Can you guess where the worst of our clutter lived? …In the art studio! Art supplies seem to have a way of rapidly multiplying and taking over a space. In order to tackle the mess, I decided to clear the shelves and get some new containers that actually fit our space and materials. I also splurged on a few streamlined items (the chairs and large baskets) to take the visual stimulation down a notch.

Read More

Art And Play

Do you ever wonder how to incorporate an art space into your child’s play space? Whether or not you have a dedicated space for either, art and play go hand in hand.

These pics are from a space I recently finished in a client’s sunroom. It used to be a dramatic play space for her two kids, but she knew they would use it more often if it was an art studio. My client wasn’t sure what to do when her 3 year old daughter wouldn’t let her move the play kitchen and “market” out of the room.

Read More

Perler Bead Display

Perler/Hama Bead Display

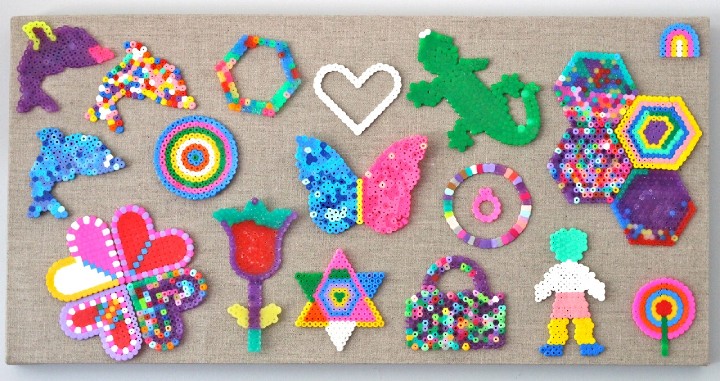
Perler beads (AKA Hama or Fuse beads) are awesome. They are great for fine motor skills and hand-eye coordination. Karuna would come home with one of these a day from preschool. Her whole class was obsessed! As you can imagine, by the end of the year we had a large bag full of these creations. Rather than stuff them into a drawer, never to be seen again, we found a way to display them!
To make them gallery ready, arrange them onto a nice canvas, then attach them with a glue gun. We used a linen canvas, but you could also paint a white canvas for a fun background color.

Here are some other ideas to display Perler beads:
Make a mobile out of them
Attach a jump-ring to the top of one and use as a necklace pendant
Attach to the front of a greeting card
You could also make them into ornaments, magnets, or use them as coasters!

What do you do with your Perler bead creations?

Naomi’s Bedroom Makeover

My niece, Naomi, recently turned 8 years old. One of her birthday wishes was to make some changes to her room. As you can see from the before photos, there was little about her room that said “8-year-old girl.” Her room housed a rarely used family computer, a toddler table set, Hello Kitty bedding from years ago, and an outdoor mat.

Naomi’s Nana offered to sponsor a makeover (within a budget of course!) so I set out help make this birthday wish come true. These are the photos I took of her room as we discussed what type of design she hoped for.


Naomi chose the bedding on the Pottery Barn teen website which gave me a jumping off point for the colors and feel of the room. She was drawn to the oranges, blues, and yellows of the bedding and her main request was a bed canopy. She also asked for some paint on the walls (including chalkboard paint), but they are in the process of putting their house on the market so we decided to only change what can easily be moved to a new house. This also meant that I had to somewhat design the room to stage the house… so less is more! My goal was to turn the room into a cozy, bright, girly (but not too girly), functional room that Naomi would want to spend time in.

Naomi’s artwork hangs in the bedroom entrance, brightening up the corner, and setting the tone for the colors of the room.

To stay within the budget, I purchased a worn used desk, repainted it, and added new knobs that Naomi picked out from Anthropologie. The bottom of the desk pulls out for extra surface space.

I made this bulletin board by upholstering a plain cork board with fun, Amy Butler fabric.


I added the shag rug and low chair so that Naomi would have an inviting space to hang out with family and friends on the floor. The soft blue blanket (another request from Naomi) adds a final cozy and luxurious touch to this tween room.