DIY Valentines from the Heart

DIY Valentines from the Heart- The Art Pantry

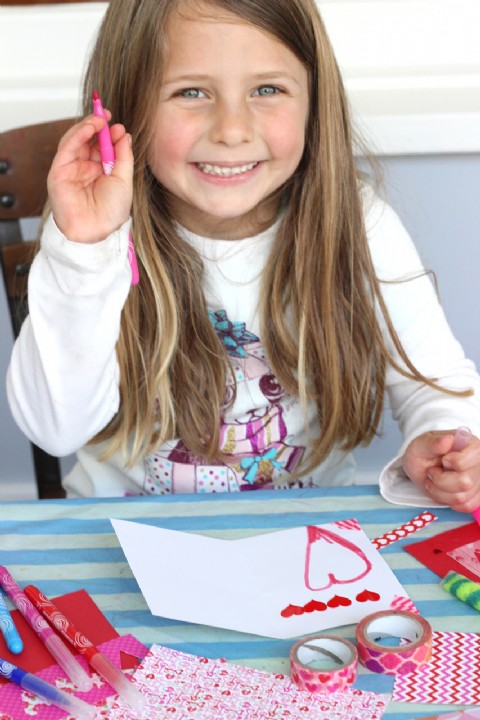
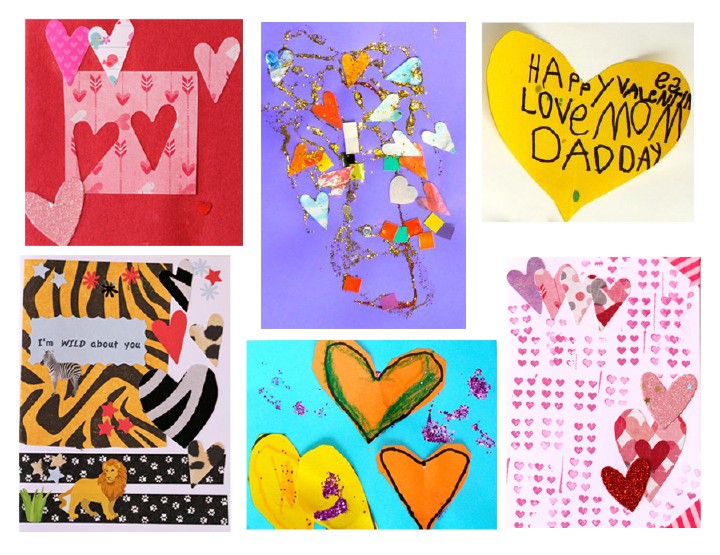
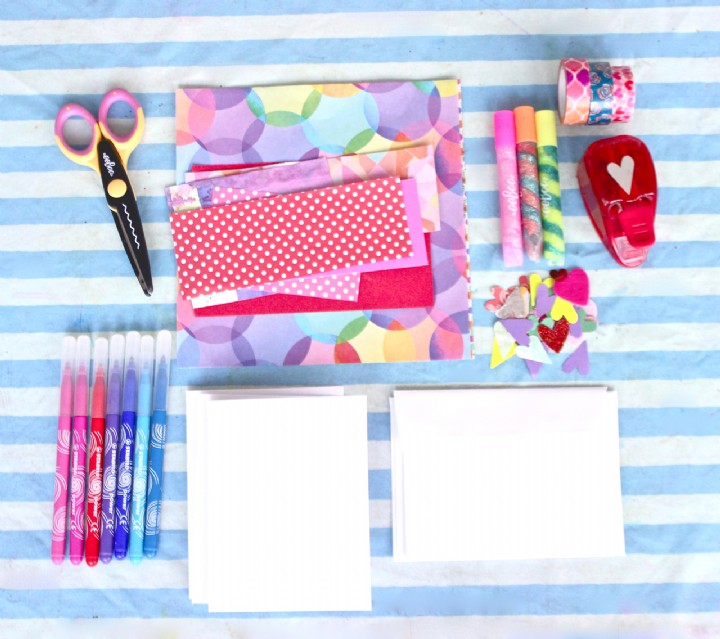
Encourage kids to express authentic gratitude and love this Valentines Day, by making something from the heart. Handmade Valentines are easier than you think! Just set up a Valentine crafting station with some fun supplies like blank cards, patterned paper, fancy scissors, glitter glue, markers, washi tape, stamps ,stickers, or whatever else you have around. Invite your children to make their own Valentine cards for friends and family. If they need a little inspiration, you can create a few samples ahead of time, or sit down and work along side them!


Handmade cards are filled with so much love and joy. I’ll take that over candy any day!


What Makes The Best Kid’s Gift?

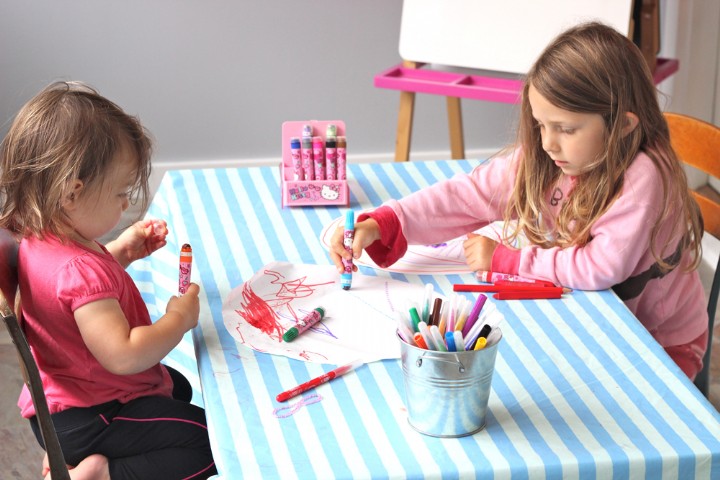
5 reasons why art supplies make the best gifts for kids

Ever since I was a little girl I have looked forward to the entire month of December. To me, this time of year is about celebration, decadence, warmth, indulgence, creating, giving, and receiving.  As I’ve grown older, I’ve become much more of a minimalist, but Christmas just doesn’t seem right without a pile of presents under the tree. 
With Hanukkah coming early this year, my girls have already begun amassing a new collection of toys and it has got me thinking about a better plan for the influx of Christmas gifts soon to come.  This plan includes sorting through and donating old toys with the girls, but it also includes being strategic in gift giving.  When it comes to holidays or birthdays, art supplies are now at the top of my list for gifts.

5 reasons why art supplies make the best gifts for kids:

1) Art supplies are consumable- they get used up and don’t contribute to toy clutter

2) They promote skills such as creative thinking, self-expression, fine motor skills, & many more!

3) They can be shared with siblings and friends

4) They can be used to make new gifts or thank you cards for others

5) Kids love them!

Nominate A Family In Need

I am so grateful and fortunate to be able to offer my kids this kind of creative enrichment and holiday abundance. If you know a child or family who does not have the means for holiday gifts, please leave a comment or e-mail me and we will send a creative gift package to a few kids in need.

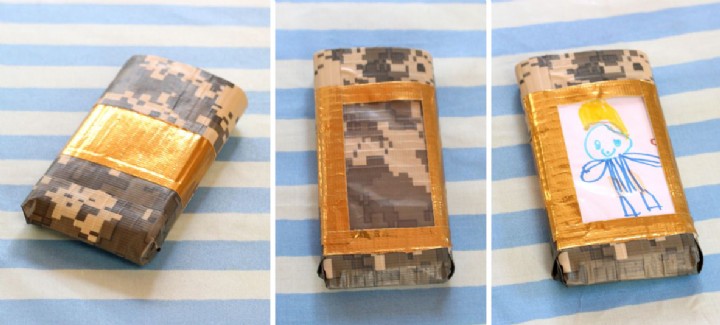
Duct Tape Cell Phone Case For Dad

DIY Phone Case with Duct tape

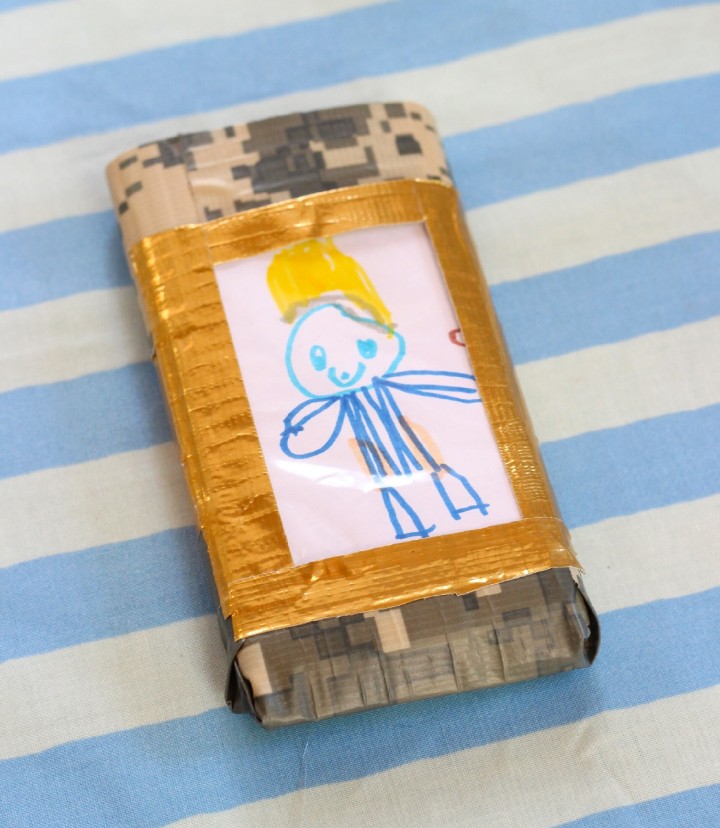
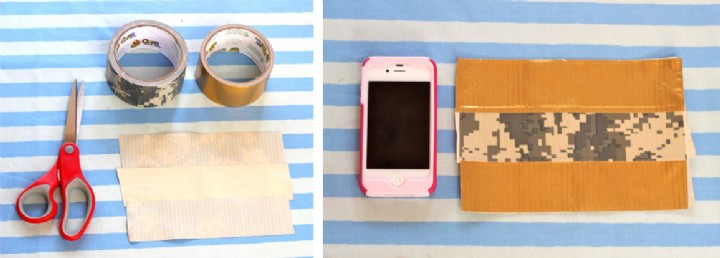
As the girls work on their Father’s Day art projects, I decided that I wanted to make my own gift for my hubby for Father’s Day. With duct tape being all the rage these days, I wanted to experiment with this fun medium and see what I could come up with.  Here’s how I made a duct tape cell phone case with a photo holder (a great way to showcase your kid’s artwork too!).

What you’ll need

  • Duct tape (one or more colors, depending on your design)
  • Scissors
  • Clear plastic bag (freezer zip locks work well)

Steps

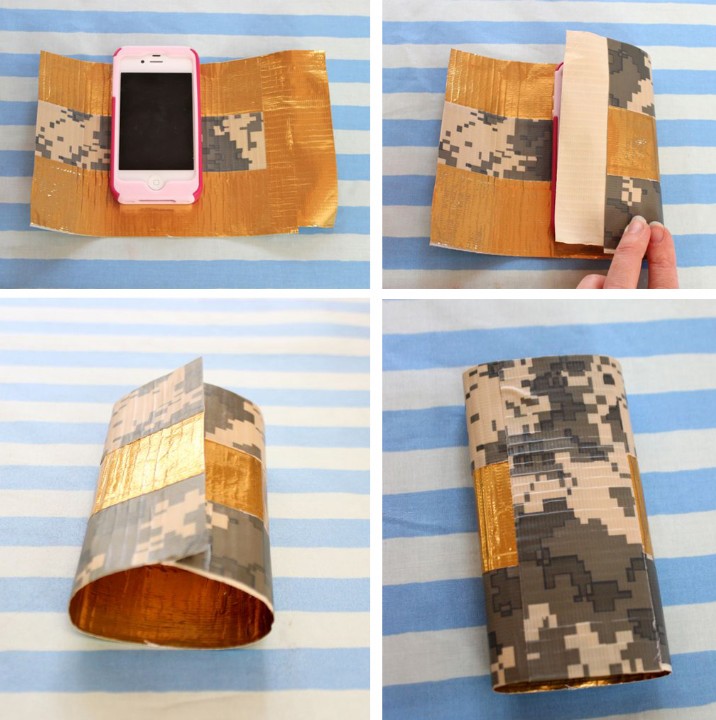
1) Start by layering three or four pieces of tape together, sticky side up, to make one large piece. The height and length depends on the size of your phone. Make sure it’s at least an inch taller than your phone and a little more than double the width (you can always cut it down later if it’s too large).
Then do the same thing, sticky side down, over your first piece. You will end up with a double-sided large rectangle of duct tape.

2) Cut a piece of tape the same length as the height of your rectangle and stick it along the side edge- with half of it hanging off.
3) Fold this side of the rectangle over your phone so that there is a strip of the sticky edge facing up.
Fold the other side over to fit snugly around the phone and press down so that it sticks to the strip of extra tape.
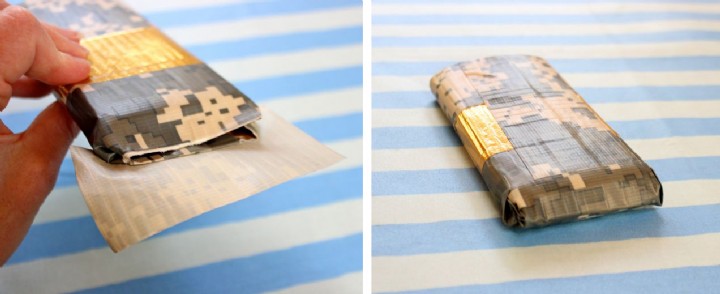
4) To seal this side, cut a new strip of tape and place it over the seam. If there is extra tape, you can fold it towards the inside or cut it off.

5) To close off the bottom of the case, fold the corners in, like you are wrapping a gift and seal it with a new piece of tape.

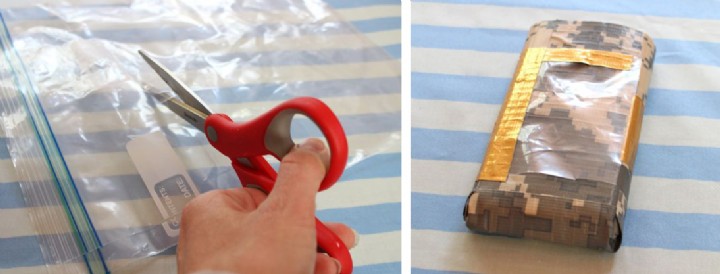
6) To make a picture slot, cut out a piece of plastic from your baggie, a little bit smaller than the front of your case.
7) Cut out four thin strips (about ½ in wide) of tape for the edges of your plastic window.
Use one strip to fold over the top of your window.
8) Place the window over your case and secure it on the sides and bottom with the thin strips of tape (so that half sticks to the window and half hangs over to stick to the case).

9) Now for the extra special touch… just cut a photo or a piece of your child’s artwork to size and slip it under the window.
So cute, I might just have to make a second one for myself!

Save

Heart Rock Valentine

Secret Admirer Heart Rock Valentines

Inspired by The Artful Parent’s heart rock valentine decorations, I suggested to Karuna the idea of making fabric heart rocks. We talked about what to do with the rocks once we made them. Giving them as Valentines was a definite, but since she already had card valentines that she had made earlier, we came up with the idea to leave them around the neighborhood as secret admirer surprises.
Read More

Holiday DIY Gift- Succulent Terrarium

This holiday season, I wanted to come up with a gift for teachers, party hosts, friends, etc. that I could make in multiples without breaking the bank. Inspired by Karen Kimmel’s Crafting Community, I decided that mason jar succulent terrariums would be perfect!

As I began creating my first jar, Karuna (my 4 yr old), asked if she could make one too. Of course, why didn’t I think of that! These little layered terrariums are super easy for kids to make on their own. They always come out beautiful, which make them the perfect kids’ crafting gift for family, friends, and especially teachers.
Supplies: 
Small succulent (garden store)
Mason jar (pack of 12 from General store, hardware store or Bed Bath & Beyond)
Decorative rocks (from garden store and/or pet store. The blue rocks are for fish tanks!)
Moss (from garden store)
Colored sand (from craft store)
Dirt (from yard or garden store)

Steps:
1)Layer the rocks, moss, sand and dirt into the jar any way you want!
2)Put some dirt at the top and make a little hole to pop in the succulent roots.
3)Scatter decorative items on top if you want and drizzle a bit of water over the top.
Done!
For a gift tag, wrap some twine around the top and tie on a tag. Easy Peasy!

Spiderweb Printmaking

For some creative Halloween decorations, we decided to try out these styrofoam spiderweb prints, seen over at Tinkerlab. We started off by cutting out two circles of foam from our Scratch Foam Boards (affiliate link), but you could also use a Styrofoam plate.
Karuna and I weren’t sure exactly how to draw a spiderweb, so we looked up a photo of one online and talked about the lines and shapes in the web. Then we each took a stab at it, and drew our version of a spiderweb and spider onto our plates.
Next we used a ball point pen over our drawings to make deep grooves in the foam. Here are our finished printing plates:

To make a print, we used a brayer (affiliate link) –a foam paint roller would do fine as well- to roll out paint onto the foam plates. In addition to black paint, we were excited to try our glow in the dark paint left over from Karuna’s birthday. We had fun swapping plates to ink and print over and over again.

After rolling out the paint, we pressed a piece of paper onto the plate, rubbed it carefully, then peeled it up to reveal our print. For an added pop of color, we used a small paint brush to paint in the spider with the opposite color.

And here are some final prints, taped to our doorway for Halloween! I haven’t yet seen whether the glow in the dark one actually works, but the yellow looks pretty cool anyway.

Happy Halloween!

Creating With Clay Slabs

For the second week of our sculpture classes, the children were introduced to clay slabs (which had been laboriously rolled out on an industrial slab roller prior to class). If you were going to try this at home, you could use a rolling pin to form a basic slab. Jhaya’s plan was to draw on the children’s interest from the previous session and make clay houses, like the cardboard box houses that were such a hit before. As it turned out, the children who were in the previous session got the concept right away and began planning on what type of house they would make. Some of their ideas: Barn, Pirate Cave, Fairy house, Castle, Pig house, Spider house, and Bird house.

This project was a great way to learn about making cut-outs in the clay for windows and doors. The children also learned about balance and stability in order to get the walls and pitched roofs to stay put.


Some of the children worked on additional items to go inside the houses, like a horse, a spider, a pig, a birds nest, or a person. When one child was trying to figure out the body proportions of her person, another child offered to stand up and model for her!

The class with all new students (who hadn’t made the cardboard houses in the previous session) decided to go in a different direction. Instead of making houses, they wanted to use the slabs to make vases, so Jhaya helped them learn how to make wall vases using two slabs of clay. To create texture, the children pressed leaves onto the clay to make prints.
Below are some photos of the children glazing their work from the first few weeks (after everything had been bisque fired).


Once glazed, the pieces were fired again for the final time.
Here are a couple of finished houses. The rest of this amazing work will be shown at our upcoming art show on may 19th- don’t miss it!
Messy Clay Discoveries and Pinch Pots

For our clay week, the 1s and 2s classes explored the qualities of clay with a variety of objects. They used tools such as rolling pins, clay hammers, plastic pizza cutters, garlic presses, and modeling tools to cut and shape their clay. You can try this activity at home with our Make+Believe Create With Clay! Supply Kit.

Other objects like toys, old CDs and necklaces, were used to add texture to the clay.

The children squished and molded bits of clay with their hands- a good work out for those tiny muscles!

After a while, the teachers introduced water to investigate what happens when the clay gets wet.

A little water made the clay softer…

A lot of water made a big, fun mess!

The classes with 3 yr olds took the exploration a step further and worked on making pinch pots out of clay, then decorated them with tempera paint, sequins, and jewels. Some kids also made “elbow pots” by pressing their elbow into a ball of clay. This creates a slightly shallower bowl than a pinch pot.


What a keepsake!

Watercolor and Foam Exploration

For our watercolor week, the children explored liquid watercolor in a variety of ways. They started by drawing on the watercolor paper with oil pastels so they could investigate the “resist” effect between the oil and water. When they painted over their drawings, the oil pastel resists the water and shows through the paint. If you want to try this at home, our Make+Believe Wonderful Watercolor Resist! Supply Kit includes everything you need.

Using tools, such as the eye dropper or the spray bottle, help to build their little hand muscles and develop fine motor skills. Since the watercolor is much more fluid than tempera paint, working at the easel adds a whole new dimension to their paintings- lots of drips and downward movement!

This session we introduced some jumbo coffee filters to paint on. The dried results are really cool- keep your eye out for our upcoming group project using the painted coffee filters!

 A favorite activity… spraying white foam paint, then driving toy trucks through the foam.

For our older toddlers, we introduced the idea of drawing a self portrait with the oil pastels using a hand held mirror for reference.

I love to see how the older children interact with materials in different ways from the young toddlers. With the foam paint, they carefully dropped watercolor onto the foam and created a marbled effect by swirling a brush through the colors.