The first week of the session, the children worked on some basic elements of hand building, learning about pinch pots (and elbow pots!), coil making, and how to attach two pieces of clay together.
In one class, the children decided they wanted to make birds nests out of their pinch pots and add “nature” to the nests. One child suggested they collect “nature” from the garden outside. So off they went to find some more materials for their projects. Inspired by the Reggio Emilia philosophy, we are always open to emergent curriculum and letting the children lead the project in a new direction. This way, the project takes on more meaning for the children and allows for a deeper learning experience.
Sometimes birds nests need a little glitter to make them sparkle!
The next class followed the lead of the previous class, when they saw the birds nests and natural materials drying on the shelf. They expanded on this by creating tall sculptures out of sticks and clay.
Our new session began last week so, as always, we started it off with a messy painting exploration. The new children got to know the qualities of the tempera paint and investigated some of our wacky painting tools, while the returning students dove right in to this familiar scene.
The 3s class also experimented with the onion and wacky painting tools, but they first worked on color mixing and creating some multimedia paintings with their new colors and tissue paper shapes.

If you want to try out some wacky finger painting at home, check out our Make+Believe Finger Painting Fun! Supply Kit.
Here are some fun photos from our last two weeks of the Winter session. Both weeks were dedicated to a variety of print-making techniques (because there are so many great ones to try for young children!) I would like to go into detail about each of the techniques, but I am on maternity leave and trying to take it easy. Our healthy baby girl, Ora, was born March 11th. She’s adorable, full of love, and sleeps really well :)
Enjoy the photos and I’ll be back with more documentation from the new session next week.
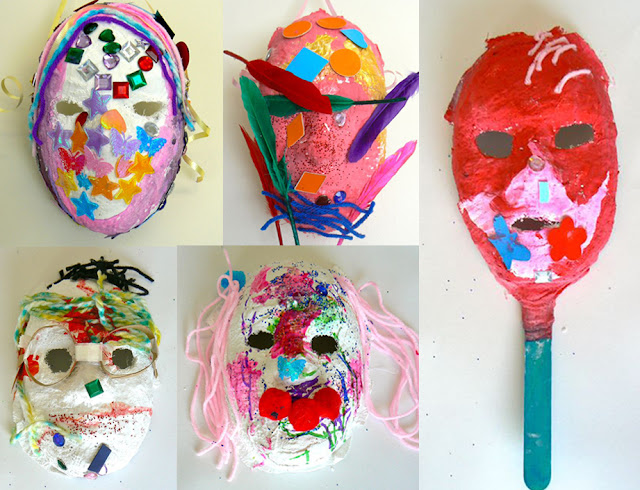
For the past two weeks, the 3s, 4s, and 5s classes have been working on making plaster masks. Each child began with a child-sized plastic face form (older kids can actually use their own faces and have someone else apply the plaster, but preschool-aged kids are still too young for this method). They first dipped strips of plaster bandages into water, then smoothed them out onto their face form. This took a lot of concentration and commitment to cover the entire face, but the kids were super into it! I’ve used paper mache with this age group and it seems like the plaster bandages were easier (or more appealing) to work with.
After covering the face forms, the masks were left to dry until the next class. The following week, the kids worked on decorating their masks. The teachers, Kory and Jhaya, first helped to cut the eyes or mouths out for anyone who was interested. To decorate their masks, some children began with markers or glue, while others began with paint.
During the first week of mask-making, some of the kids discussed how they wanted to decorate their masks while Jhaya wrote down their ideas. The next week, Jhaya reminded the children what their original ideas were and provided them with specific materials to help them execute their plans.
After adding the final details, the kids decided whether they wanted to add string or a stick to hold up their masks. A few masks were kept as is, but most of the kids were really excited about the idea of actually wearing their masks!
A few of the final pieces… so impressive!